There’s something undeniably satisfying about a bowl of creamy, dreamy hummus-the way its velvety texture effortlessly scoops up fresh veggies, crunchy pita, or golden falafel. But why settle for store-bought when you can unlock the secret to homemade hummus that’s every bit as smooth, rich, and flavorful? In this guide, we’ll dive deep into the art and science of crafting the perfect hummus from scratch. Whether you’re a kitchen novice or a seasoned chef, get ready to discover tips, tricks, and flavor twists that will elevate your dip game to irresistible new heights. Say goodbye to bland and hello to creamy perfection!
Mastering the Art of Chickpea Preparation for Ultimate Smoothness
Perfecting Chickpea texture for Unrivaled Creaminess
Unlock Creamy Perfection begins the moment you tenderize your chickpeas to silky softness. The foundation of truly unforgettable hummus is in how you prepare your legumes-whether you’re starting with dried chickpeas or canned, each method unlocks layers of velvety smoothness and richer flavor.
From my years as a culinary content creator and food stylist, I’ve discovered that mastering chickpea preparation transforms homemade hummus from ordinary to show-stopping. Imagine chickpeas so soft they practically melt on your tongue, creating that iconic creamy texture enticingly photographed across vibrant Mediterranean spreads.
Prep and Cook time
- Soaking: 8-12 hours (overnight)
- Boiling: 1 to 1 ½ hours
- Total Active Time: 25 minutes
Yield
Approximately 3 cups of perfectly creamy chickpeas, enough for 4-6 servings of hummus.
difficulty Level
Medium – requires planning ahead and patience but rewards you with spectacularly smooth results.
Ingredients
- 1 cup dried chickpeas (preferred for superior creaminess)
- 1 teaspoon baking soda (for tenderizing)
- Water (for soaking and boiling)
- Pinch of salt (added at the end of cooking)
Instructions
- Soak your chickpeas overnight: Rinse thoroughly under cold water. Place them in a large bowl and cover with three times their volume in cold water. Stir in 1 teaspoon of baking soda and let soak for 8-12 hours. This softens the skins and cuts down cooking time dramatically.
- Rinse and prep for cooking: Drain the soaking water and rinse chickpeas well to remove residual soda-essential to avoid a bitter taste in the final hummus.
- Cook gently: Place the chickpeas in a large pot and cover with fresh cold water by at least 2 inches. bring to a rolling boil, then reduce to a simmer. Skim off any foam or skins that float to the surface during cooking for a cleaner flavor and smoother texture.
- simmer until ultra-tender: Cook for 1 to 1 ½ hours, testing softness at the 45-minute mark. You want chickpeas that yield easily to gentle pressure.Adding salt in the last 10 minutes enhances flavor without toughening skins.
- Cool and peel (optional but transformative): Once tender, drain and optionally slip off skins by gently rubbing chickpeas between your fingers or rolling them between two clean towels. This extra step lifts your hummus to silkier, luxury-level creaminess.
- Save the cooking liquid: known as aquafaba, this starchy broth can substitute for oil or be added during hummus blending for luscious consistency and natural binding.
tips for Success
- Baking soda magic: This little trick softens fibers and reduces cooking time but be sure not to exceed 1 teaspoon per cup of dried chickpeas to avoid an off-flavor.
- Patience is key: Undercooked chickpeas will result in grainy hummus. Test frequently toward end of cooking.
- Peeling chickpeas: If you’re short on time, you can skip peeling, but your hummus will be less silky. For a starring spread, dedicate a few minutes to this step.
- use aquafaba wisely: Keep it aside to add moisture during blending rather of water or oil. It binds the dip beautifully, enhancing creaminess without greasiness.
- Make ahead: Cooked chickpeas freeze well in airtight containers for up to 3 months, preserving your creamy perfection whenever inspiration strikes!
Serving Suggestions
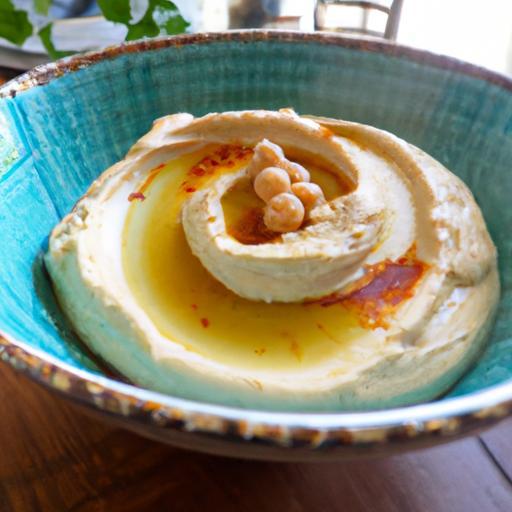
Present your creamy chickpeas transformed into hummus with a drizzle of extra virgin olive oil, a sprinkle of smoked paprika, and a scattering of toasted pine nuts. Fresh chopped parsley adds vibrant color, while a squeeze of lemon zest brightens each bite. Pair with warm pita wedges or crisp vegetable sticks for irresistible dipping moments. For an elevated experience, consider layering hummus with roasted red peppers or caramelized onions, creating a visual and flavor feast.

| Nutrient | Per ½ cup cooked chickpeas |
|---|---|
| Calories | 135 kcal |
| Protein | 7 g |
| Carbohydrates | 22 g |
| Fat | 2 g |
For further reading on chickpea culinary uses, check our thorough Ultimate Chickpea Recipes. To dive deeper into the science of softening legumes, explore this expert guide from Serious Eats.
Elevate Your Hummus with Flavorful Ingredient Combinations
Unlock Creamy Perfection in your homemade hummus by experimenting with vibrant, flavorful ingredient combinations that transform this beloved Middle Eastern staple into an extraordinary delight. Originating as a simple blend of chickpeas, tahini, lemon, and garlic, the magic truly happens when you infuse layers of freshness and spice tailored to your taste. Whether you crave a smoky, savory twist or a luminous, herbaceous punch, these additions elevate every silky scoop into an irresistible experience.
Prep and Cook Time
- Preparation: 10 minutes
- Cooking: 20 minutes (for cooking chickpeas from dried) / no cook if using canned
- Total: 30 minutes
Yield
Approximately 2 to 2 ½ cups (serves 4-6 as a dip or spread)
Difficulty Level
Easy – Medium depending on ingredient availability and blending method
Ingredients
- 1 ½ cups cooked or canned chickpeas, drained and rinsed
- ¼ cup tahini (well-stirred)
- 3 tablespoons freshly squeezed lemon juice
- 2 cloves garlic, minced
- 3 tablespoons extra virgin olive oil, plus more for drizzling
- ½ teaspoon ground cumin
- ½ teaspoon smoked paprika
- Salt to taste (start with ½ teaspoon)
- 2 to 4 tablespoons cold water, as needed for creaminess
- Optional add-ins for flavor elevation:
- ¼ cup roasted red peppers, finely chopped
- 2 tablespoons finely chopped fresh parsley or cilantro
- ½ teaspoon za’atar spice blend
- 1 tablespoon toasted pine nuts or chopped toasted almonds
- ½ teaspoon harissa or a pinch of cayenne pepper for heat
Instructions
- Prepare your base: If using dried chickpeas, soak overnight and cook until tender (about 1 hour).If using canned, drain well and rinse.
- Combine key ingredients: In a food processor, add chickpeas, tahini, lemon juice, minced garlic, olive oil, cumin, smoked paprika, and salt. Pulse to combine.
- Adjust texture: With the machine running, gradually add cold water one tablespoon at a time until you reach a smooth, creamy consistency. Scrape down the sides with a spatula as needed to ensure everything blends evenly.
- Enhance with flavors: Add your choice of optional ingredients, such as roasted red peppers or fresh herbs. Pulse briefly to distribute evenly without fully pureeing these vibrant additions.
- Taste and refine: Adjust salt, lemon juice, or spices according to preference. If the hummus feels too thick, add a touch more water or olive oil for a silkier finish.
- Serve: Spoon into a shallow serving bowl. Create swirls on the surface using the back of a spoon. Drizzle with olive oil, sprinkle smoked paprika or za’atar, and garnish with pine nuts or chopped herbs for visual appeal and added texture.
Tips for Success
- For ultimate creaminess, peel the chickpeas by gently pinching each between your fingers to remove the thin skins – this step takes extra time but rewards you with the smoothest texture.
- Use fresh lemon juice rather than bottled; the brightness truly lifts the flavor.
- Balance your garlic carefully-too much can overpower delicate notes, so start with less and add more if desired.
- Make ahead: Store in an airtight container and refrigerate for up to 4 days. Flavors deepen beautifully overnight.
- Customize spice levels: Harissa or cayenne offers gentle heat, while smoked paprika contributes warmth and color.
- Don’t have a food processor? A powerful blender works well – just be patient and add water slowly to avoid overloading your machine.
Serving Suggestions
Experience hummus as the star centerpiece of any gathering: pair it with freshly baked pita bread or crisp vegetable crudités. Create a vibrant mezze platter alongside olives, stuffed grape leaves, and marinated artichokes.
For extra indulgence, top your hummus with a drizzle of luscious herb oil or a spoonful of tangy preserved lemon chutney.A sprinkle of toasted seeds or fresh microgreens provides a beautiful contrast in texture and color, making every bite an inviting celebration of taste and presentation.

| Nutrient | Per Serving (¼ cup) |
|---|---|
| Calories | 150 |
| Protein | 5g |
| Carbohydrates | 14g |
| Fat | 8g |
For more creative hummus variations and expert techniques, explore our comprehensive hummus variations guide. To deepen your understanding of tahini’s role in customary recipes, visit Bon Appétit’s tahini breakdown.
Secrets to Achieving the Perfect Creamy Texture Every Time
Unlock creamy perfection every time by mastering the subtle art of balancing moisture, texture, and flavor in your homemade hummus. This beloved Middle eastern classic thrives on a silky mouthfeel that’s both luxuriously smooth and satisfyingly rich-qualities that elevate it far beyond the typical store-bought versions.Whether you’ve struggled with grainy or dry hummus, or simply want to refine your technique, these insider tips will transform your chickpea blend into a luscious, dreamy dip that invites endless scooping and savoring.
Prep and Cook time
- Preparation: 15 minutes (plus soaking time if using dried chickpeas)
- Cooking: 45 minutes (if cooking chickpeas from dried)
- Total time: 1 hour (using canned chickpeas reduces time substantially)
Yield
Approximately 2 cups of velvety hummus-perfect for 6 to 8 servings as an appetizer or snack.
Difficulty Level
Easy to Medium: Ideal for home cooks eager to dive deeper into texture mastery with basic blending tools.
ingredients
- 1 ½ cups cooked chickpeas (about 1 can, drained and rinsed, or freshly cooked)
- ¼ cup tahini (well-stirred for creaminess)
- 3 tbsp fresh lemon juice (for bright acidity)
- 2 tbsp good-quality extra virgin olive oil (plus extra for drizzling)
- 2 cloves garlic (minced or grated)
- ¼ to ½ tsp fine sea salt (to taste)
- ½ tsp ground cumin (optional, for a subtle earthy warmth)
- 2 to 4 tbsp ice-cold water (essential for creaminess)
- Paprika or smoked paprika, fresh parsley, pine nuts (for garnish)
Instructions
- Add the tahini and lemon juice to your food processor. blend on high for about 1 minute until it becomes pale, fluffy, and creamy. This step is key for that rich texture base.
- Incorporate the garlic, cumin, and salt next, pulsing until well mixed. The garlic’s sharpness infuses slowly into the smooth tahini, building depth.
- Slowly add the chickpeas, blending steadily with short pulses. Scrape the sides occasionally to ensure even mixing.
- Begin streaming in the olive oil, then add ice-cold water one tablespoon at a time. this is the secret-that cold water loosens the hummus, creating lightness without watery dilution.Continue until the texture is perfectly creamy and spreads easily.
- Taste and adjust seasoning: Add a little more salt or lemon juice if desired. For an extra velvety touch, blend for an additional 30 seconds.
- Transfer hummus to a bowl, making a shallow well in the center. Drizzle olive oil generously, then sprinkle with paprika, toasted pine nuts, and freshly chopped parsley for vibrant contrast.
Tips for Success: Achieving Creamiest Hummus Every Time
- choose your chickpeas wisely: Freshly cooked chickpeas yield the silkiest hummus. If using canned, rinse thoroughly and consider peeling the skins for ultra-smooth results.
- Ice-cold water is your best friend: This simple addition adds lightness, creating that coveted creamy texture without oil overload.
- don’t rush the tahini-lemon step: Whipping the tahini with lemon juice first aerates the paste for superior fluffiness.
- Use a powerful food processor or high-speed blender: A strong motor ensures emulsification that’s dense yet smooth.
- Experiment with extra ingredients cautiously: Avocado or roasted vegetables can enhance creaminess but adjust water and oil quantities to maintain balance.
- Make ahead and rest: Hummus flavors deepen if rested overnight in the refrigerator; bring to room temperature before serving for optimal creaminess.
Serving Suggestions
Present your creamy hummus in a wide, shallow bowl to showcase its silky surface. Use the back of a spoon to create gentle waves or ripples on top, perfect for catching olive oil and garnish.
- Serve alongside warm pita bread, crisp vegetable crudités, or atop toasted flatbreads.
- Garnish with freshly chopped parsley, a sprinkle of smoked paprika, toasted pine nuts, or a few dashes of sumac for a colorful pop.
- Pair with extra virgin olive oil for dipping or drizzle za’atar spice blend over the top for a fragrant twist.
- For a vibrant presentation, add whole chickpeas or caramelized onions at the center.
| Nutrient | Per Serving (2 tbsp) |
|---|---|
| Calories | 70 |
| Protein | 2.5g |
| Carbohydrates | 6g |
| Fat | 4.5g |

For those eager to expand their middle eastern culinary repertoire, explore our Roasted Eggplant Baba Ganoush recipe for a smoky, creamy choice.to understand more about the nutritional powerhouse of chickpeas used here, visit Harvard T.H.Chan School of Public Health.
Serving Suggestions and Storage Tips for Freshness and Taste
Unlock Creamy Perfection with your homemade hummus by serving it in ways that delight both the eyes and the palate. picture a luscious, velvety dip swirled gently in a shallow bowl, its surface glistening with a drizzle of golden-tinged extra virgin olive oil, scattered with a dusting of smoky paprika or za’atar. fresh herb sprigs, like cilantro or parsley, crown the centerpiece, inviting eager hands to dive in.
For an elegant spread, serve your creamy masterpiece alongside an array of vibrant accompaniments-warm pita wedges, crunchy cucumber ribbons, jewel-toned bell pepper strips, and crisp baby carrots. You can even elevate the experience by layering hummus in a layered mezze platter, paired with olives, roasted nuts, and marinated artichokes for a Mediterranean escape right on your table.
Looking to uplift a simple meal? Use this hummus as a creamy base for toast, topped with roasted cherry tomatoes and a sprinkle of flaky sea salt, or as a luscious spread inside veggie wraps and sandwiches. A dollop on your favorite grain bowls or alongside hearty falafel also works wonders, adding a silky contrast to textured bites.
Optimal Storage Techniques for Keeping Your hummus Fresh
The key to maintaining the bright, fresh taste and the signature creamy texture lies in proper storage. After blending,transfer the hummus to an airtight container and pour a thin layer of high-quality olive oil on top.This protective barrier curbs oxidation, preserving its delicate flavors and creamy consistency for up to 5 days in the refrigerator.
when you’re ready to enjoy the leftovers, simply give the hummus a gentle stir to reincorporate any separated oil. If it has thickened in the fridge, stir in a splash of cold water or fresh lemon juice to bring back that silky smoothness without diluting the flavor.
For longer storage, homemade hummus freezes beautifully. Portion it into a freezer-safe container, leaving some headspace to accommodate expansion. Thaw it overnight in the fridge and stir thoroughly before serving. note that the texture may be slightly less creamy but remains delicious and perfect for cooking or spreading.
Visual appeal is vital-before serving, sprinkle with your favorite toppings like toasted pine nuts, a few whole chickpeas, or a light dusting of sumac for a vibrant pop of color that entices the senses. Remember, every detail counts when aiming for that picture-perfect bowl of creamy perfection!
For more inspiration on complementary dishes, check out our detailed Perfect Grain Bowl Recipes. Also, explore the rich history and health benefits of chickpeas at Healthline’s Chickpea Nutrition Guide.

Q&A
Q&A: Unlock Creamy Perfection – The Best Homemade Hummus Guide
Q1: What’s the secret to achieving that irresistibly creamy texture in homemade hummus?
A1: The magic lies in patience and technique! Start by soaking dried chickpeas overnight to soften them, then simmer gently until tender. Using baking soda during soaking and cooking helps break down the chickpea skins, resulting in a smoother blend. Don’t rush the blending-process in bursts and add cold water little by little to coax out velvety creaminess.
Q2: Can I use canned chickpeas instead of dried ones? will it affect the texture?
A2: Absolutely, canned chickpeas are a convenient shortcut! However, homemade hummus made from freshly cooked dried chickpeas often has a richer, creamier texture. If you use canned, rinse them thoroughly and consider peeling a few for extra smoothness-removing skins makes a surprisingly big difference!
Q3: What role does tahini play in the hummus recipe?
A3: Tahini is the nutty, velvety soul of hummus, crafted from ground sesame seeds.It brings depth, richness, and a subtle earthiness, balancing the bright tang of lemon and savory garlic.Quality tahini can elevate your hummus from good to show-stopping, so pick a creamy, well-stirred jar if you want the ultimate texture.
Q4: How crucial is the lemon juice in the overall flavor profile?
A4: Lemon juice is the zestful spark that cuts through the creaminess, giving hummus its vibrant, fresh edge. It brightens the dish and balances the richness of tahini and chickpeas.Freshly squeezed lemon juice is best-it infuses life into your hummus and awakens every ingredient.
Q5: Are there any blending tips to ensure the perfect hummus consistency?
A5: Yes! use a high-powered blender or food processor to ensure even mixing. Start by blending the tahini and lemon juice first to whip it into a light,fluffy base. Then add the chickpeas gradually, blending and scraping down the sides. drizzle in cold water or aquafaba (the chickpea cooking liquid) slowly to achieve that luscious, silky texture.
Q6: What are some creative twists to try once I master classic hummus?
A6: Once you’ve nailed the classic, the world is your hummus oyster! Add roasted red peppers for smoky sweetness, caramelized onions for depth, or a sprinkle of za’atar for aromatic warmth.For a vibrant touch, try mixing in cooked beets for a stunning magenta hue or swirl in a handful of fresh herbs like parsley and cilantro for a garden-fresh zing.
Q7: How do I store homemade hummus to keep it fresh and creamy?
A7: Store your hummus airtight in the fridge for up to 5 days. To keep it creamy on top, drizzle a thin layer of olive oil before sealing-it forms a protective cover and adds extra richness. If it thickens, stir in a splash of cold water or lemon juice to revive its silky charm before serving.
Q8: Can hummus be made without tahini for those with allergies or preferences?
A8: Yes! Although tahini is traditional, you can swap it out for nut or seed butters like sunflower seed or almond butter for a creamy alternative. Keep in mind, this will shift the flavor slightly, but the texture and richness remain delightful. Adding a touch more lemon juice helps balance the new flavors.
Q9: What common mistakes should I avoid when making homemade hummus?
A9: Avoid rushing chickpea cooking-undercooked beans yield grit, not cream. Don’t skip peeling if texture matters, as skins create graininess. Overusing garlic can overpower; start small and adjust.Lastly, blending cold water gradually is key-too much at once can make your hummus runny rather of luxuriously smooth.
Q10: How does aquafaba enhance homemade hummus?
A10: Aquafaba, the humble chickpea cooking liquid, is a secret weapon! It acts as a natural emulsifier, lending silkiness and lightness without diluting flavor. Adding it instead of regular water during blending creates that dreamy, fluffy hum you find in artisan versions from top Mediterranean kitchens.
Unlock your kitchen’s potential and savor every spoonful of homemade hummus-the creamy crown jewel of simple, soulful cooking!
In Conclusion
As your journey through the world of creamy, dreamy hummus comes to a close, remember that the perfect batch is as much about your personal touch as it is indeed about the ingredients. with these tips and tricks in hand, you’re equipped to craft hummus that’s smooth, flavorful, and irresistibly satisfying every time. So go ahead-blend boldly, season thoughtfully, and savor the homemade goodness that only you can create. Unlock the door to creamy perfection, one delicious scoop at a time.